Pages

Thursday, December 20, 2012

Furniture Painting! The job of the future!

My Pinspiration


Do you ever have those ideas when you think you're an effin' genius? Don't pretend you don't, cuz that's a BOLD FACED LIE! I'm going to freely admit that there are days when I think I'm the smartest person in the world. Like really...and it's embarrassing, because usually three days later, I come to my senses and realize that I could quite possibly be one of the dumbest human beings on the face of the earth...but at least I had my five minutes of genius, right? 

Well, this is a PRIME EXAMPLE of one of those times...let me tell you. Being a stay-at-home mom has its advantages. You get to spend lots of quality time with your kids (wait a minute...that's an advantage????). You also get the opportunity to manage your house in a way that most would love to, if they had the time. Unfortunately, being a stay-at-home mom also has its disadvantages...A PAYCHEQUE. Not to say I'm want for anything, because I'm not. I'm extremely lucky that my husband has a job that keeps us in a fantastic house, with a lot of space. Our kids have the opportunity to play sports and extracurricular activities. I can buy anything I need when I need....BUT, sometimes it's nice to not have to feel like you have to run buy a purchase with the "breadwinner"...right? Wouldn't it be nice to buy your husband a birthday present that wasn't really on his dime?

SO...I came up with this AMAZINGLY WONDERFULLY FANTASTICALLY crafty idea that I was going to flip furniture. What does that mean, you ask? Well, let me tell you. Every day I was going to troll sites like Craigslist, Kijiji and Freecycle and I was going to scoop up "FREE" furniture, refinish it, and then sell it for a profit. SMARTEST THING YOU'VE EVER HEARD?? Um, yes!

I, of course, ran the idea by my husband, because unfortunately, he was going to have to be the muscle of this operation, as I couldn't lift a box of pop nonetheless a piece of furniture...but he thought I was ingenious too, and we made a pact. If I could find a good piece of furniture, with good bones within the appropriate proximity to our house, my husband would schlep out, bring it back to the house and I would make it beautiful and sell it for a million bucks. How could we go wrong, right???????

Well, here's a picture of piece number one:
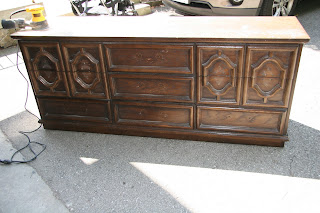
Has some potential right?
 I found it on Kijiji. It was sitting on the curb, along with a mirror and a microwave. First come, first serve. Well, I called my husband at work IMMEDIATELY and told him that we had a line on a masterpiece in the making. He'd better get his skinny butt home on the ASAP and pick this thing up before we lose out on the diamond in the rough.

Well, my husband didn't rush home. He arrived at his regular time and sat down to have a civilized meal with his wife and children, all the while I'm itching and refreshing the ad on kijiji every second to make sure it hasn't been picked up yet. Finally, my husband gives me the thumbs up and heads out to pick up the dresser. I pace and pace, waiting to hear if my husband found it, or arrived at the address only to find three people fighting over it. NOTHING. I texted...NOTHING. Then I worried that he got there and tried loading it in the car only to have it fall on him. So now he's pinned underneath this coffin of a dresser. No one can see him (he's really skinny) underneath that piece. Then he pulls a 127 hours and has to cut his leg off, just to escape death. He's dragging himself along the road hoping that someone sees him and calls 911 but no one does...and he expires...all for a friggin' free piece of furniture. And then, I see headlights pull into the driveway. I rush outside to find out what happened and I'm in awe. My husband did it! he found the dresser and jammed it into the trunk of our SUV. And, the dresser is awesome! All the parts are there. All the drawers are intact. I'm gonna make a friggin' mint on this puppy! We pull it into the garage where it will rest until I begin its makeover.

So, here's what I think as I rub my money grubbing hands together. I'm gonna get a can of spray paint for $5 and I'm gonna sell this baby for $500. Then I'm gonna do this 4 times a week and I'm gonna be a millionaire. So, in the morning, I rush out to Home Depot to grab my can of spray paint. Obviously I splurge and get the primer and paint in one, because you know me...I'm not gonna sand this thing and I'm not gonna clean it either. This is a money making operation. Time is money...right?

So, I take off all the super ghetto hardware, and I shake my can of spray paint like it's a Polaroid picture (thanks, Andre 3000!) and I give it a go. I read that to properly refinish a piece of furniture, you need to start with some thin coats using long strokes, so I try my best to do so.Then it starts to bubble. Uh oh...what did I do? Finally, I decide that maybe I should do some research on this before I go all Bob Villa on this thing... Technically a primer and paint spray can should do the trick, but it doesn't really get in all the nooks and crannies. A proper primer (using a brush) is the best way, unfortunately, the best finish always happens after a nice sanding (MORE TIME....tick, tick, tick...) After the primer has dried, then I can use the spray paint. Okay.... so lets try this again.


I go back to Home Depot. Find some Zinsser Cover Stain primer and some medium and fine grit sand paper for my orbital sander and I start again. Just as an FYI...I give the top and sides of the dresser a proper sand and then I lightly (cuz I'm lazy) sand the fronts of the drawers. Then I use my trusty foam brushes and start painting the primer on the dresser.'


Now, just to keep track...I've now purchased my paint and primer spray can, 2 sandpaper packages, a package of foam paint brushes and a quart of primer. My profit is slowly dwindling...

So after the primer has dried, I reshake my paint can and get ready to make this dresser the beauty it really wants to be...

Again, with long strokes and thin coats I begin. Pffft, pffft, pffft...went the spray can. Um, wait a minute. I've only sprayed half of the top of the dresser. The can can't possibly be finished right? WRONG-O! One can covered basically nothing. Was I not doing thin enough coats? ARGGGGGGGGHHHHHH! Back to Home Depot I go...Now upping my investment to 4 more cans, this time, I just got the plain ol' spray paint, not the paint/primer in one, but still, at $6 a can, I'm wondering if this is really worth it. Finally I get everything painted evenly and it's starting to come together!


Then my husband asks me "I know how much you've spent on supplies for this project...but how much is your actual time worth? You should really be keeping track of the amount of time you've spent on the project and price it accordingly". Good point from a smart man...But I don't know how much my time is worth. And really, how long have I spent on the project. Each coat takes 10 minutes to spray on and then there's a lot of just waiting around. This is really starting to get complicated.

After the final coat of spray paint has dried I take a look at the piece. It really does look nice, but just needs the last bit of accessorizing....Hardware. In some cases, I'm sure you can reuse the hardware from the original piece of furniture, but this was the exception, OF COURSE. Ka-ching...more money spent. So, I head out to Lee Valley (the mecca of furniture hardware...seriously!) and look for super cheap pulls and knobs (of course, this dresser has fifty million drawers with nineteen buhzillion knobs on each one...ugh!). The cheapest Lee Valley has is $2 a knob and $4 a pull (Good Night!). I get home, screw them all in and my husband and I drag it into the house for photos.

Now comes the hard part. Tallying up all I've spent on supplies, plus figuring out how much my time is worth, then figuring out a price that's feasible for someone to pay. I had a small conference with a group of friends. I was hearing ridiculous figures like $500 as a starting sale price. We checked kijiji and craigslist to find out what similar pieces were going for and finally settled on a proper sale price. As always, I start off with a price that I know will be negotiated, as everyone on those sites do (have you ever paid full price for something on Kijiji? Doubt it.)

So, here's the ad I posted:

9 Drawer Dresser - $350
Refinished vintage 9 drawer dresser. Could also be used as a sideboard or TV console. Beautiful and eclectic detail with new modern hardware. Fantastic condition. 18” deep x 70” long  x 29” tall. Must be picked up. Pic attached


I was a bit worried that I wouldn't get any bites, but by the end of the day had 5 leads and 3 days later, this little lady was hustled out of my living room and into the house of another. For the bargain price of $280 - and a sweet $200 profit for me.

Now, the profit is solely based on the supplies I purchased and not the time that I put in...so would I do it again? Probably not. If this were a proper business, I could see it working. But I would need a moving truck, as my SUV can only hold a certain size of furniture, and I would need two people to move the furniture. My poor husband found it difficult enough trying to get the dresser into the car by himself. I would also invest in a proper paint sprayer (paint cans are so wasteful and environmentally terrible...). I would also need a warehouse to store and paint all the furniture I've acquired (though my garage is a double, it's filled with a ton of crap and in the winter a car to boot, which doesn't allow a lot of room for much of anything else).

Needless to say, the idea was brilliant, but the investment needed to create a real business is one that I'm not ready for...JUST YET...!

Shout Outs:

Here's to all the furniture painting tutorials...

How to paint an old chest of drawers by In My Own Style
Painting furniture with no sanding, some short cut tips by Karla's Cottage
Furniture Painting Tutorial from Just a Girl
The boy's dresser by Centsational Girl

If you'd like to try this out for yourself, take a look at the Kijiji and Craigslist Free Tabs in your area and troll. Also, sign up for Freecycle in your area and get daily updates of free things that are being offered! Good luck!

Wednesday, December 19, 2012

For The Man Who Has EVERYTHING...

My Pinspiration

There are few men in my life that are very special to me, and my Father-In-Law is one of them. This year, my FIL (as I like to refer to him) celebrated a MILESTONE...His 70th Birthday! Now, my FIL is quite difficult to buy for. He doesn't provide a list...and he usually buys whatever he wants whenever he wants, so sometimes it's a stretch to find him that perfect gift. As I was trolling Pinterest one day, I came across the above pin and it enticed me to take a further look. A woman, for her father's 70th birthday (yes...I'm liking it...), sent a postcard to 70 of her father's closest friends and family members and once they were mailed back, gave them to her father as a gift.

Sounded perfect to me. Not everyone has 70 different friends to send postcards to, and I imagine for the average Joe, this would potentially be a difficult gift to put together. Maybe for a 40th or 50th...something a little more feasible. My FIL, however, has a hundred million buhzillion friends and it was going to be a chore to narrow down which ones we were going to send them to.

Anyway, I ran it by my husband, who agreed that it would be an awesome gift...something sentimental that could be more of a keepsake rather than a practical present, which is generally what FIL gets. But it wasn't going to be an easy one to pull off. Firstly, I had to put my amateur photoshop skills to use and create a postcard that we could send out. The original pin's postcards were absolutely awesome. I loved the wording, I loved the idea, I loved everything about it...SO I COPIED IT WORD FOR WORD! (blatant ripping off is the sincerest form of flattery, right?) And, as the original pinner included, we added a intro/instruction card, just giving the recipient an idea as to what this was for and what they were supposed to do with it.


The instruction/Intro insert

And the postcard itself was created as just that. The picture side of each postcard was going to be assigned a number (1 through 70, of course) and the postcard side had our address c/o the birthday boy and a space for each recipient to put their memory. And then halfway through, I realized that numbering the postcards was going to paint me in a corner. What happens if, for some reason, I needed to rearrange the cards? The numbers wouldn't allow me to do that. So what I ended up doing was penciling in a number/letter on the front of the postcard. My OCD, took over, and I created an Excel spreadsheet of each number/letter and who it was assigned to so that I could keep track. I'm thankful I did this because I found that as postcards were mailed back, some people only put first names, or didn't sign them at all, so it was still great to know who they were actually from. Finally, each postcard was stamped so that the RSVP'er didn't have to worry about anything other than filling this little guy out.

Photo/Number Side

Postcard side

Now what we needed was a list of my FIL's favourite people to send to and we were off to the races. My Mother-In-Law (MIL, of course), wonderful as she is, provided me with a fantastic list of addresses for friends and family members, and we set to work.

 
As the "return to" date approached I started getting a bit nervous. Only 20 responses had arrived...that's not a great percentage...So I prepared myself for the worst and begged my poor MIL to hand over some photos that I could use as fillers...just in case. But, of course, at the last minute (and when I say at the last minute, I truly mean it - we received our last one at 9pm the night before FIL's birthday party...EEEEEK!) almost all of the postcards arrived! Phew!

I added numbers to my blank fronted postcards, as well as my photo fillers, each on their own numbered page, to keep with the theme and I added a little table of contents at the end so that dear ol' FIL could see all those who participated.

So, now that I had all the responses...what was I going to do next??? I wanted it to be presented in a book format, but I wasn't sure of the best way to put it together. Initially I was going to just hole punch the cards and link them together with a binding circle...but that just seemed like a mediocre way to present something so meaningful...SO, I had to go full bore. Which meant actually creating a properly bound book. Now, that sounds all fine and dandy...but let's remember the time constraint I'm working under...It's 9pm the night before the birthday party. I can't exactly send it out to Kinkos and have it spiral bound and ready for the next afternoon, could I? Nope...so back to Pinterest I went, praying to the higher powers that I would find an easy way to bind a book and make it look somewhat presentable. I came across several pins about binding books by sewing the paper together and that seemed like a fantastic idea BUT...I didn't leave enough room in the margins to allow space for the stitching and still keep all the memories on the postcards legible. Back to the drawing board. After scouring Pinterest forever, I used the old, forgotten and perhaps even archaic method otherwise known as Google...Yes, friends...I went against all things natural in the world of Pinterest (keep it on the downlow or my membership may be revoked!!!!)

but, lo and behold, I found something that sounded like it would work!

DIY Bookbinding Tutorial...um, duh! It even came with its own YouTube video!!!!!!! Awesome! So, I followed all the details, grabbed my materials and started this super easy, but extremely time consuming method of getting all the pages to meld together.


Materials photo from diybookbinding.com

Simple Simon! Clamp all the pages together using the clips and the paint sticks and put thin layer after thin layer of glue as your binding agent. The time consuming part is waiting for the glue to dry before adding the next coat. Yes, ladies and gents...I went all out this time, set my laziness aside and waited the full 30 minutes between coats to make sure this sucker wasn't going to budge. At the end of the day, there were 5 coats of super glue keeping these postcards together. At the end of the process, it almost looked like a note pad. Perfect. I even tried out hanging the weight of the book by one page to make sure it didn't rip apart and (THANK GOD!) it remained intact.

Now that the inside of the book was finished, I needed to work on the outside of the book. You know the old adage, "You can't judge a book by its cover"...well, the actuality is, is that EVERYONE judges a book by its cover, and this was going to be no exception. If I was going to make this a gift to remember, I needed to make it look like one.

I grabbed an old cardboard backing from my pad of construction paper, cut three pieces, two for the front and back cover and one for the spine. I then spray-adhesived those pieces to some awesome Value Village fabric (you knew VV was going to make an appearance in this post, didn't you???) and the outside cover was born. I then glued a little piece of canvas onto the spine of the book and then glued the book onto the inside spine of the cover, and I was started to see the bigger picture. It was actually looking pretty stinkin' good!


Then I found some semi-masculine paper to create an inner lining and I was FINITO!


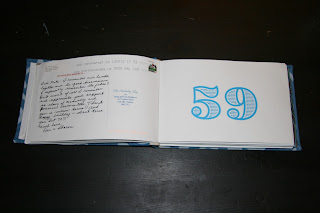
The finished product!

Now, if I were to ever do this project again, what would I do differently? When I was initially planning this book out, I figured that over the summer, people would be vacationing/cottaging/away. I thought that giving everyone a long RSVP time would be better. Frankly, this backfired, as most people saw the return by date and set it aside (a.k.a. lost it),  and I ended up sending countless email reminders, which was silly. I think I would also include photos (which this time were a filler, rather than an enhancer), especially for family and really close friends. But all in all, I feel like it came together pretty well.


And how was the gift received? Well, let's put it this way. The gift was opened, and the first page was read. Then the book was closed. Then the tears came. My FIL sat both my husband and I down at the end of his party and we made him read all the messages from those who were in attendance, and more tears were shed. He then took the book on his annual trip to Florida to really give the book a read. I truly hope the book made his day. As the responses arrived at my house, it was clear to me that this special man of mine had touched so many people's lives in countless ways, and I was lucky to have him in my own life. In my heart of hearts, I know that this gift will be a treasured one. Love you Papa!

Shout Outs

Inchmark for giving me this wonderful idea and making me look like a superstar daughter-in-law. Please check out this blog and give it the props it deserves!

DIY Bookbinding for giving me the means to present this um...present...lol.

To all those who sent in their response postcards. You truly made this gift a memorable one. Thanks for taking the time to fill out and send us your amazing memories! Here's to another 70! xox

Tuesday, December 18, 2012

Spice Rack Turned Nail Polish Display Case

My Pinspiration
I came across this particular pin and wondered if this would really serve me well. For those of you who know me, you'll know, I'm not overly "girlie"...I'm actually pretty anti-girl. I don't really wear dresses or typical "girl" clothes. I don't really care how my hair looks and I definitely don't care about makeup. Generally my focus is getting my teeth brushed before I leave the house and my wardrobe worries consist of me throwing on whatever is closest to me (could be dirty, could be clean), usually purchased from Le Village De Value...but that's just me.

There IS, however, one thing that I'm a real tight-ass about, and that's painted toe-nails. Really, you say? Yes. Feet generally gross me out, but naked toes just make me feel weird. Now, it's totally odd, because my fingernails have to be naked, or if I'm really feeling special...they get clear nail polish. I'm not sure why, but when I see painted nails, my mind always goes to fake nails...which makes me thing of Lee Press-Ons, which makes me think of the 80s, which apparently was a bad time for me, because this is why I just can't bring myself to paint my fingernails (vicious circle...?). ANYWAY, weirdo...you might be thinking. So why the eff do I need a nail polish rack if I only paint my toe nails.  Good question, because in all honesty, there's only a handful of colours that I like...BUT, I guess I had almost enough to fill a rack, so here we are...

When I saw the above pin, I clicked to get the tutorial, but alas, it was only a picture, so I had only my own personal vision to lean on (or blame...) for this creation. It seemed fairly straight forward, so I didn't worry about it too much. I picked up an ol' used spice rack from VV and threw some tacks in the back to use as "painting feet" (this keeps the rack elevated so that when you spray paint you can get a little along the back lip without having to wait for the first coat to dry and then flip, etc.)


Then I ran into the garage, threw down a garbage bag, laid out the spice rack and sprayed away. I used a black primer/paint in one spray paint, as I'm lazy and didn't want to waste any time cleaning or sanding the rack. (Lazy? That doesn't sound like me...) And the reason I picked black and not some fun colour like the original pin, is because I'm dour and I like black, okay? Sheesh! And maybe a little because the rest of the furniture in my master bath is black, but mostly the first reason.


After the first coat


I committed to three coats (with um, 10 minutes dry time in between coats, cuz I don't have that kinda time to waste (or patience...?), you know...) Then I slapped up two nails (willy nilly, of course) et voila. My own personal nail polish holder! Easy and cute! Hurray!


After my final coat. Hey, where'd it go?

Final Product. Yessssssss!
As you can see, I have room for a couple more, so if you're looking for a lovely stocking stuffer for me...you're welcome!

Shout Out:

Special thanks to Barbara B. who pinned the photo onto her Arts & Crafts Ideas board. Word!

Monday, December 17, 2012

How to Clean a Chalk Board

My Pinspiration
If you are like me, you have curious children who asks (CONSTANTLY...) "What are we doing tomorrow????" So, I came up with the brilliant idea (or so I thought) of using up a humongously empty space in my kitchen and throwing up a chalkboard. The entire month would be laid out with important events (like school, sports, birthday parties) for all to see. And this, I thought, would end any questions about what was happening in the days to come. My kids could just look up at the kitchen table during meal times and find out for themselves what was going on.  The one thing I didn't think of when plotting my brilliant plan was that my kids were 2 and 4 and COULDN'T READ YET...Ugh. So, now, instead of "What are we doing tomorrow?", I get, "Mom, what does it say on 21? What does it say on 30? Why isn't there a number after 31? Blah, blah, blah..." WORST IDEA EVER.

But, OF COURSE, I'm too stinkin' lazy to take it down, AND it really does help let the adults of the household know what's on schedule for the days ahead...SO, on the wall it will remain.

At the end of every month, I'm in charge of wiping the chalkboard down and starting a new month fresh (you can probably imagine the dinnertime conversation on the first of the month...every day something brand new and it hasn't even been discussed four hundred and seventy three times yet! JOY JOY!!!!). At first the cleanup wasn't an issue. I just used my trusty chalkboard brush and away the words went... but as any school teacher could tell you (do teachers even use chalkboards any more? Am I showing my age???), after constant writing and erasing, the chalkboard just never seemed to get clean. It just looked like a dirty mess. Water wasn't cutting it, and I was worried that using a household cleaner would just dissolve the chalkboard paint entirely. I wasn't sure what I should do next...


Am I suppose to start a new month on this "blank" canvas? Yuck!


So I figured that Pinterest would be the best spot to find out HOW to get that chalkboard squeaky clean again. And I was right. The pin sent me to a blog that showed a beautifully black chalkboard. No streaks, no faint writings. Just a straight up blank canvas...like new! But as I perused the blog, the "how" seemed a little questionable: use a can of coke in a shallow bowl with a rag. Dip the rag into the coke and then wipe. What? The blogger did mention that she had also initially had the same reservations as me. How is it possible to use something as saccharine as COKE to clean a chalkboard? Logically it would leave a sticky film, right? Whatever. It was worth giving a try I suppose. I collected my materials...


...and got to work. Because I was so skeptical, though, I decided to do a side by side taste test of sorts...this time the competition wasn't Coke vs. Pepsi, but rather Coke vs. the age old, tried and true cleaner...Water...

So, I drew a line in the sand (so to speak) and cleaned.

In the left corner, hailing from some sketchy factory in Atlanta, Georgia and funded by dentists worldwide:  COKE!!! In the right corner, from the dawn of time and with famous parents hydrogen and oxygen, WATER!!!!!

 DING! DING! DING! Let's get it on!


So, I did just that. Cleaned one side with Coke (making sure not to saturate the board with the pop) and the other with water. Initially it looked like it was a fair match.

Seems Even-Steven to me, right?

But then, the liquids dried and the judges had finally made their verdict. The ref called both contestants to the middle of the ring and grabbed both their arms...which one was going to be victorious???

"And the winner is...."


wait for it....


...


..

.

COKE! (The crowd goes wild!)


Proof is in the pudding!

So, each month, I crack open a Coke, pour a bit in a dish and hand the rest of the can to my husband to polish off. (I can't drink that poison!). My chalkboard looks like I just painted it on the wall and as I write all of our events on the calendar...I hesitate for a second. Might I find some peace by leaving the calendar blank? Or am I just asking for extra problems????


YAY!

As for similar products... I have used both Coke and Diet Coke in my cleaning process. Both give me the same results. I haven't, however, tried out Pepsi or any PC brand of "Cola", but if you're willing to give it a try, I would love to know if I can save some cash by using the store brand rather than the pricey name brand! So drop me a line.

Shout out:

For this and other fun DIY ideas, check out The Creaking Floorboard